
Create engagement and extend watch time by giving your viewers some control over your stream. Through activities such as subs, Bits, and Channel Points, it’s possible for these events to trigger scene changes, new camera angles, sound effects, animations, or even turn off the stream!
(Watch an example of viewers blasting my air horn on stream!)
Admittedly, initial setup and ongoing configuration can be a pain. However, the effort is worth it, as it unlocks a whole new level of interactivity on your stream. Follow this guide and give the people what they want!
What You’ll Need
- OBS (sorry Streamlabs OBS users)
- OBS Websocket
- LioranBoard
Assumptions
Going to assume that you’ve already got OBS installed. If you don’t, do that now!
Setup
1. Download and install OBS Websocket. Get it here.
2. Download LioranBoard. Get it here. If you have any sort of antivirus protection on, there’s a good chance that it’s going to prevent you from opening the files. Assuming you got the file from the original source, you should be fine.
3. Open the file LioranBoard Receiver. This is the main application you’ll be working with to configure your commands.

4. The app will show a dialogue box asking you for a bunch of different info. Let’s work through that.
- Odds are, you can leave “Listen Port” and “OBSWebsocket Port” set at their default values. Just in case, you can go into OBS, and navigate to Tools > Websocket Server Settings, and make sure that the server port number is the same as what’s entered in LioranBoard
- You will also want to check off “Auto connect to OBSws” and “Auto connect to Twitch”
- Hit “Accept” to close the window.
5. Now we’re on the main window. Let’s focus on configuring the connection settings. First, open OBS.
6. Go back to LioranBoard. Click “Connect to OBS” to connect LioranBoard to OBS.
7. Click “Link your Twitch”. Then click “Open ULR”. Finally, authorize the permissions for LioranBoard to connect with Twitch.
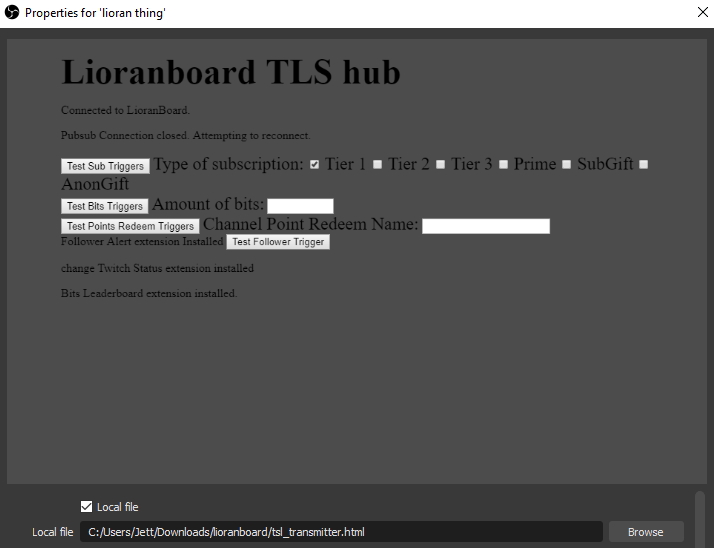
8. The “Connect to Twitch” step is a bit different. Go into OBS and add a new browser source. Check off “Local file”. Then under “Local file” click “Browse. Navigate to the folder with your LioranBoard files and select “tsl_transmitter.html”. You’ll see some weird text appear on screen. Simply hide the source, as you’ll never need to actually show it. If you’ve properly connected everything, “Connect to OBS”, “Link your Twitch”, and “Connect to Twitch” will all be grayed out on the LioranBoard main screen. If you checked off “Auto connect to OBSws” and “Auto connect to Twitch” earlier, LioranBoard will connect to everything automatically every time you turn on the app.
NOTE: Each time you stream and want to take advantage of this functionality, you’re going to need the LioranBoard Receiver running.
Now it’s time to actually make cool stuff!
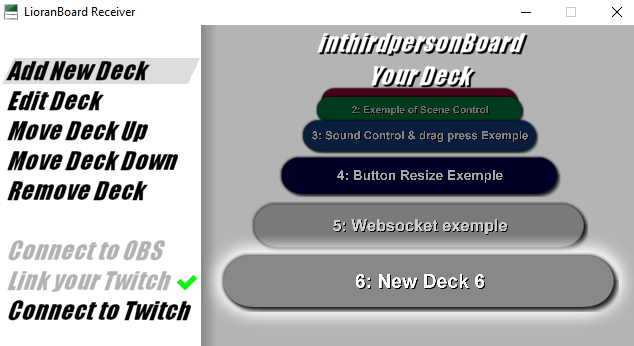
9. On the LioranBoard main menu, click on “Add New Deck”. Open that new deck, which should reveal an empty grid.
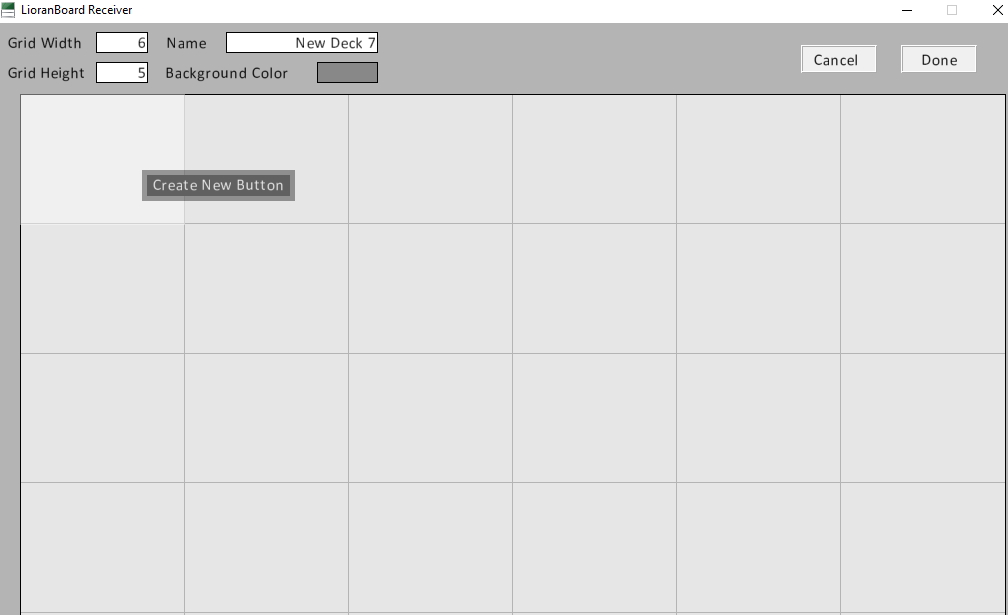
10. Click on a cell and select “Create New Button”.
11. Right click on that new button and select “Change text”. Name your button to what you want that function to be.
For the purposes of this guide, we’re going to make a basic scene switch. We’re going to have the scene switch to a “Hype Cam” when a user cashes in their points. In OBS, name a new or existing scene as “Hype Cam”.
12. Go to OBS. Set up a new scene in OBS called “Hype Cam”. Or rename an existing scene as “Hype Cam”. However you go about it, keep tabs on what the name is in OBS, as you’ll need to pick this scene out from a list within LioranBoard.

13. Go back to LioranBoard. Right click again on that new button and select “Add Commands”. This is where you’ll program what you want OBS to do when the reward is triggered. There are a ton of different things you can do in the command screen, but we’re going to continue with our “Hype Cam” example. First, hit the “+” button to add a command.

14. Click on the furthest left column. You will see a ton of different commands that LioranBoard can do, such as toggle sources on/off, shut off your stream, or even programmatic functions that can unlock new functionality such as randomization. For now, we’re going to simply choose “Scene Switch”. Then, under “scene-name”, pick the “Hype Cam” scene from your list of OBS scenes.

15. Now click on the “+” button. Add another scene switch, but this time set it to your default view. In the Delay column, add the value “5000”. You’ve now programmed LioranBoard to switch to your “Hype Cam”, then change back to your default view after five seconds. Press “Done” when you’ve finished.

16. Back on the grid view, right click on your new button and select “Add Twitch Triggers”. Click the “+” icon to add a new trigger. In this case, let’s add a trigger for “Points Redeem”. Under “Redeem Name”, use the EXACT name that will appear on the Channel Points rewards button.
17. Time to set up the reward in Twitch. From your dashboard, go to Community > Channel Points. From the Channel Points Menu, click on “Manage Rewards”. Then click on “+ Add New Custom Reward”.

18. Feel free to configure the description, icons, and other variables however you want. However, make sure that the “Reward Name” is exactly the same as the “Redeem Name” in LioranBoard.

19. Finally, go to your Twitch chat. Cash in for the new Hype Cam reward. If you programmed everything correctly, your OBS will show the Hype Cam for five seconds and then switch back to your default view. Hooray!
This combination of OBS Websocket and LioranBoard is insanely powerful. Within a few days, I already programmed my stream in such a way that viewers could blast my signature air horn while also being treated to a neat animation of the air horn emote popping onto the screen and pulsing with each blast. Going forward, I’ll be investigating a number of different ways to add interactivity through this mechanism. Would also love to see how you use it!
Extra Tips
- If you have multiple scenes, make sure to add all of the associated images/sounds/sources on every scene you want it to work on. Don’t want users to cash their points onto a scene that doesn’t support that reward!
- Look into scene nesting. Within OBS, it’s possible to add a scene within a scene as a source. Simply add a new source and select “Scene”. For the purposes of LioranBoard, it’s easier for me to just trigger the “Snorlax Cam” source, which features the video feed and a border”, rather than to program the video feed and the border as separate entities. Scene nesting has many other benefits beyond this, so play around with this functionality and figure out all of the different ways it can streamline your workflow!
Additional Resources
“Control OBS With Twitch Channel Points, Subs!” by Nutty
“Behind the Scenes camera controlled by Twitch chat!” by Gothix

Buy the Elgato Stream Deck Now From Amazon.com

[Purchasing through this Amazon affiliate link gives me a small commission without adding any extra cost or effort to you. Thanks for your support!]
