When your voice gets recorded or broadcasted through a microphone, it oftentimes emphasizes the harsh tones that occur when you make certain sounds with your voice. In particular, sibilant consonants such as “s” and “z” are overemphasized through a microphone and create tones that are unpleasant to listen to. You don’t want to drive viewers away because it hurts their ears every time you say words like “snake”, “sand”, or “zebra”.
Thankfully, minimizing those unpleasant tones can be done through a de-esser. You can set one up in OBS within a matter of minutes with the help of this guide. Kudos to Atomic Overdrive for almost all of this information, as I followed their guide while trying to resolve my sibilance issues and am largely adapting their knowledge in this post. However, I will try to add any extra insight I have to make this a more complete guide for you, including where to put the de-esser in your processing chain.
Follow along and let’s make your voice even more pleasant to listen to by adding a de-esser in OBS!
1. Download and install TDR Nova from the official website. This third-party plugin is a parallel dynamic equalizer, which can be used as a de-esser and a whole lot more. For the purposes of this tutorial, we’re gonna focus on using it as a de-esser.
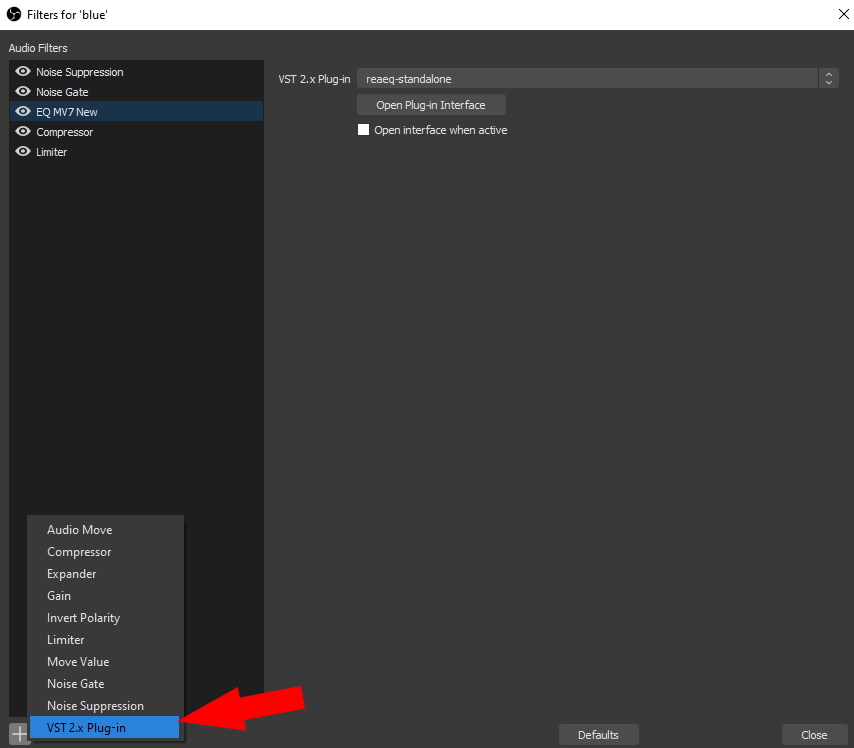
2. Once you have installed, open OBS. Under “Sources”, right click on your microphone source and select “Filters”. Click on the “+” and select “VST2.x Plug-in”. Give it the name “De-esser”.
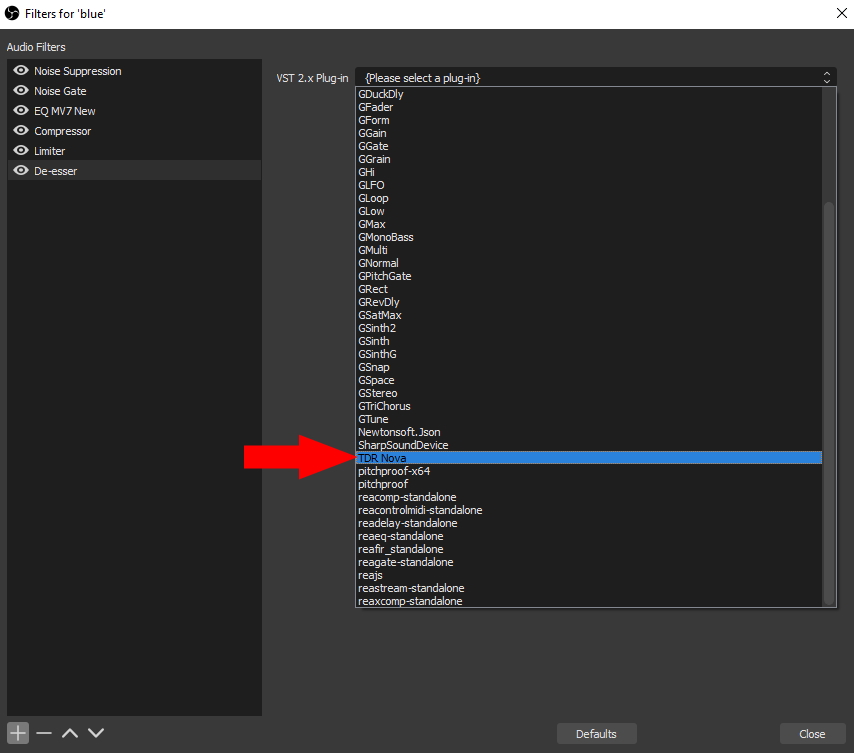
3. Click on the [Please select a plug-in] dropdown menu and select TDR Nova.
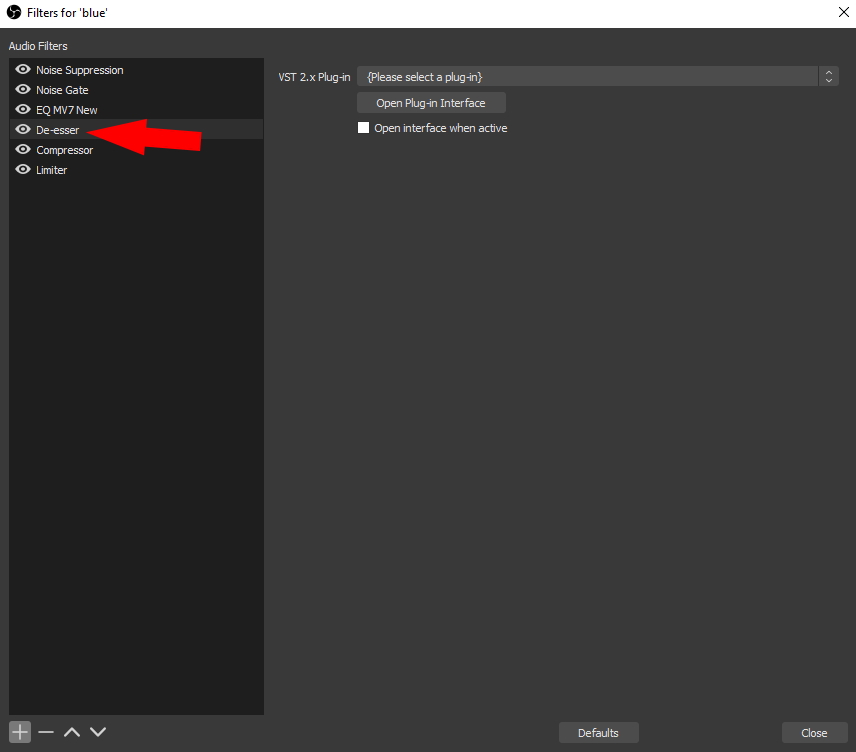
4. If you already have a set of microphone filters, use the up and down arrows to move the de-esser between your EQ and your compressor. Order matters here, as you want the de-esser to minimize the “s” tones after the EQ. If you put it before the EQ, odds are that the high shelf you’ve set in your EQ will actually amplify the “s” tones that you tried to minimize in the first place.
If you don’t have any microphone filters set up yet, I would strong recommend setting up a noise filter, noise gate, EQ, compression, and limiter as well. After you’re done with the de-esser guide, head over to my main microphone guide for instructions on how to set everything else up!
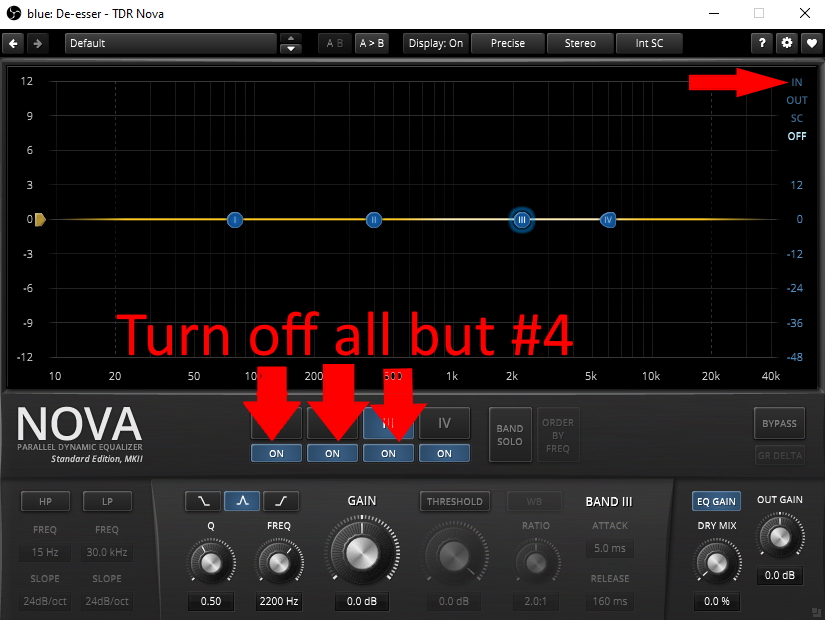
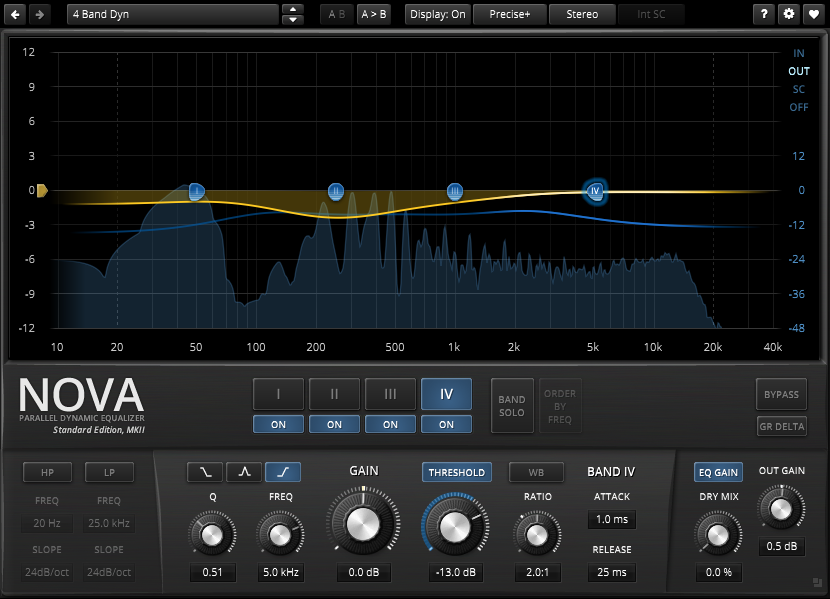
5. When you first open TDR Nova, nothing will happen when you talk into your mic. Click on “IN” at the top right so that TDR Nova will recognize your mic. From there, turn off “I”, “II”, and “III”. You’ll only need the “IV” band, which will act as our de-esser.
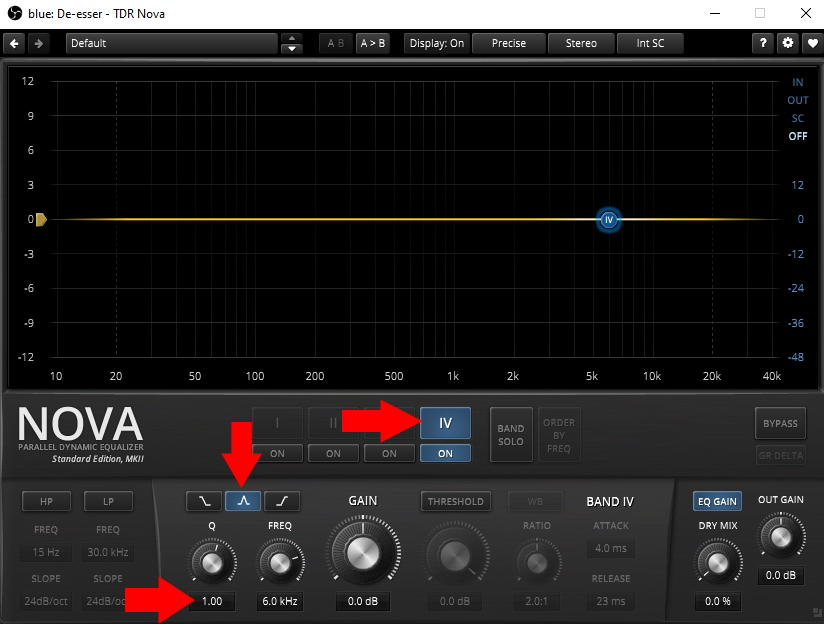
6. Click on the “IV” button. This will show us the controls for the 4th channel. Where you see the different line shapes, click on the bell shape in the middle. Under Q, set the value to 1.00.
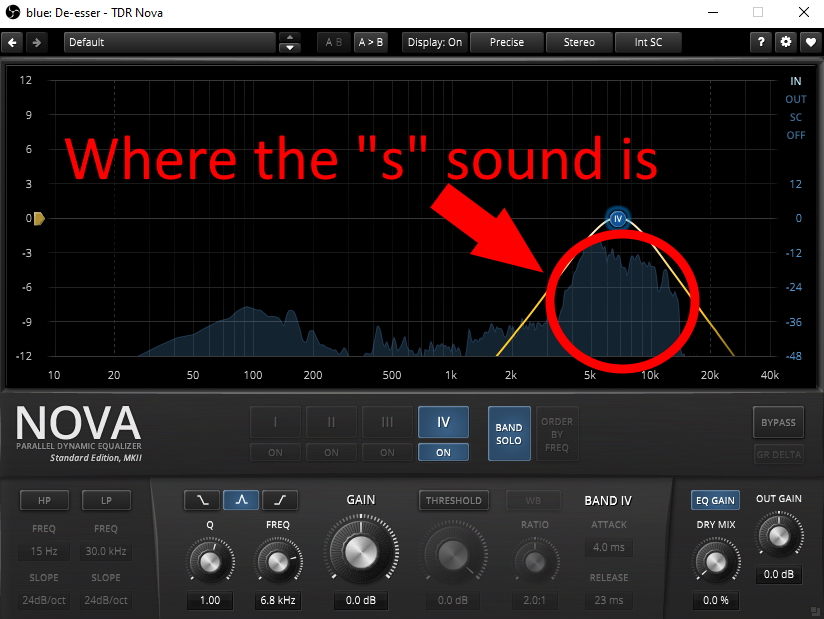
7. Now it’s time to find the offending frequencies in their voice. Click on the “Band Solo” button, which should change the yellow line to a bell. Now hiss into your microphone. Everyone’s voice is different, so the exact spot for where the “s” sound is located will be in a different spot, but you should see sizable bump somewhere between 5k and 10k. Use the “Freq” knob to adjust the placement of the bell so that it fits the area where you’re making the “s” noise.
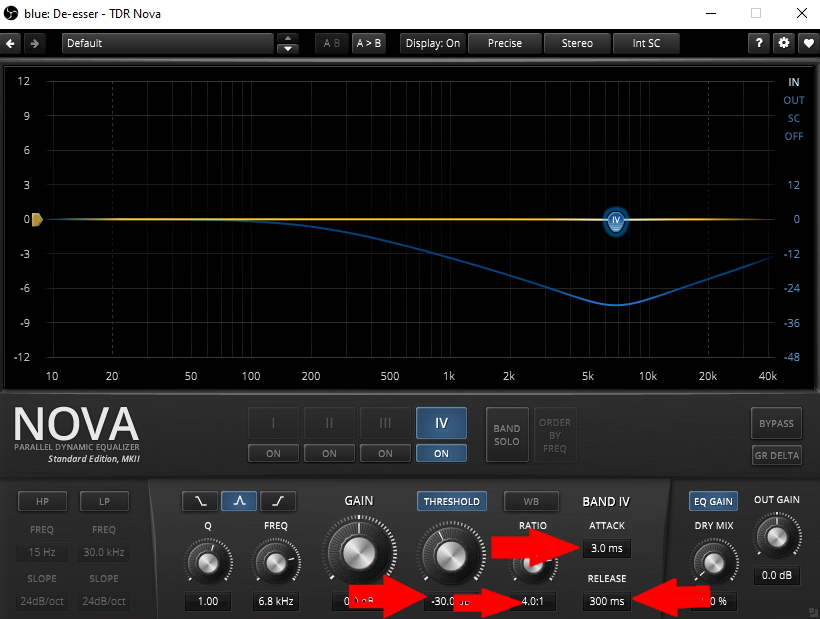 8. Click on “Threshold”. Set that value to -30db. When the “s” noise occurs in your voice, it will trigger the compressor just for that frequency range when when it reaches -30db or above.
Set the ratio to 4.0:1. This denotes how much the sound in this range is compressed when it passes the threshold. Most are fine at a value of 3.0:1 or 4.0:1. I have mine set to 4.5:1, as that’s what seems to work best for me. You can go as high as 6.0:1, but only in extreme cases. Record samples at different compression rates until you find a sound that minimizes the “s” sound without making your voice as a whole sound compressed.
After that, set your “Attack” to 3.0ms and “Release” to 300ms.
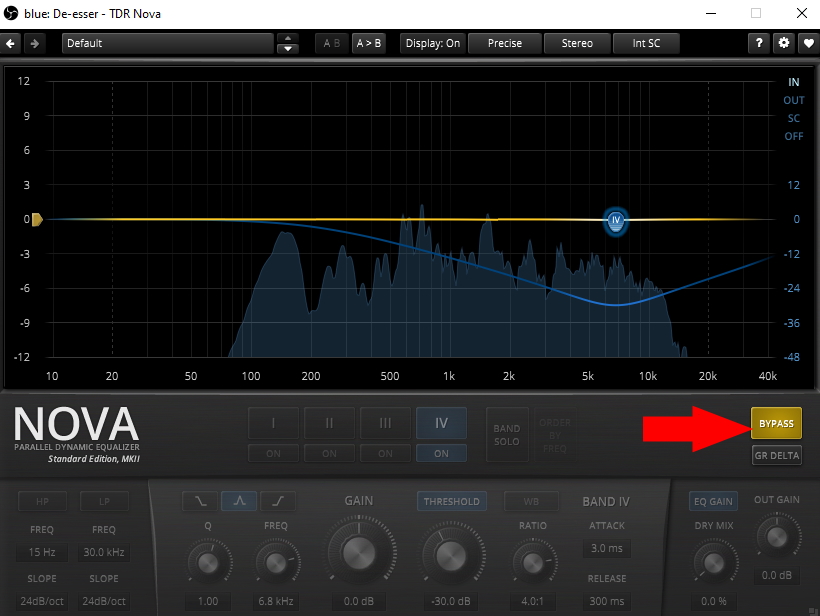
9. Let’s do a test recording to see how the de-esser is working. Hit record in OBS and then talk into your microphone by saying a bunch of words with “s” sounds. Toggle “Bypass” on-and-off as you speak to hear the what it’s like with the de-esser on vs. off. If you’re happy with it, great! Make sure to turn off “Bypass” when you’re done. Odds are, if you’re going to tweak anything, it’s likely to be where the bell curve is placed or the amount of compression set. Feel free to tweak the settings to best fit your voice and mic.
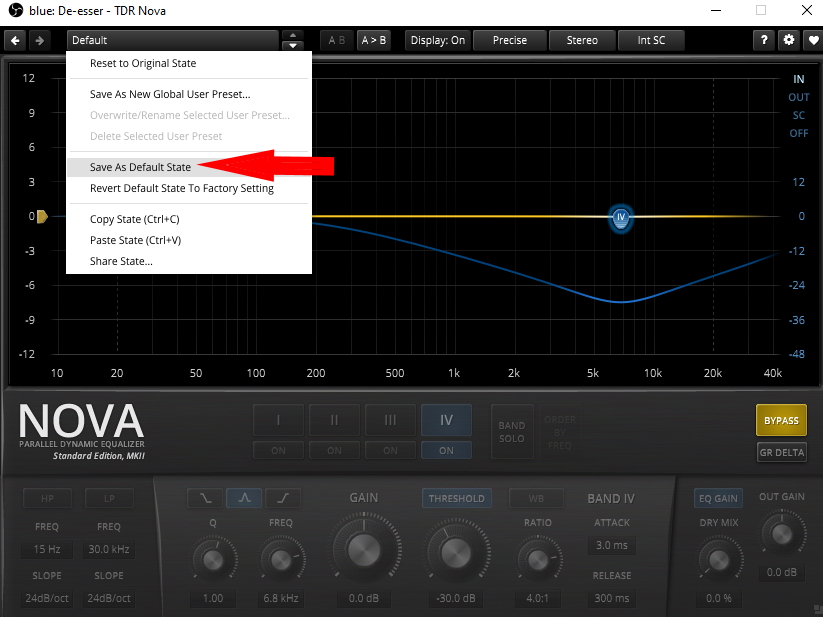
10. One last step! Right click on “Default” in the menu bar and select “Save As Default State”. Now your de-esser is set up and saved!
With this de-esser in place, your mic should minimize the harshness of the “s” sound without without compromising the other frequencies in your voice. Hoping this guide helps you sound your best for all of your Twitch and YouTube streams going forward!
 Buy The Blue Yeti Nano Now From Amazon.com

[Purchasing through this Amazon affiliate link gives me a small commission without adding any extra cost or effort to you. Thanks for your support!]
 Buy The Shure MV7 Now From Amazon.com
[Purchasing through this Amazon affiliate link gives me a small commission without adding any extra cost or effort to you. Thanks for your support!]

Reblogged this on DDOCentral.
Holy moly…. worked like an absolute charm. Cheers for this!
This just made me sound like I’m playing on a gramophone, funny effect but not what I’m looking for.
For some reason, my sound on the scale has most of the area filled in with blue where yours is more black, why is this and how do I fix mine?
The article forgets to mention that you need to unclick Band Solo button once you’ve finished setting the parameters. Cheers!
OMG, after I unclicked Band Solo, it sounded great and not like I was in a tin can.
I get no sound into the plugin, everything else works fin with the mic in OBS.